 I recently wrote an article about the importance of keeping in touch with people after they’ve connected with us at church through something like a baptism. One good way in which to keep in touch with people is by sending a regular email newsletter. You’ll be familiar with these – I get a whole range, from Waterstones to my gym to my friend who works for a charity. Some, granted, you let languish in the spam folder but others are genuinely useful – one I often read is the newsletter from Durham Cathedral.
Sending a regular email newsletter might sound like a bit of a nightmare to organise, but not if you know which tools you can use. One of the best out there is provided free of charge by Mailchimp.com (The basic model is free, you can pay to remove the Mailchimp logo from the bottom of the email). We have been using this (free version) for over a year now to keep in touch with people connected with church, see a recent example here.
Great things about Mailchimp:
- it manages your email list for you – even letting you know if an address has been incorrectly spelt
- it looks after the all-important unsubscribe feature – you don’t need to do anything, it automatically adds a link at the bottom of your email enabling people to unsubscribe and then you get a notification if someone does (in a whole year we’ve still only had less than 10 people unsubscribe from our list).
- it’s easy to use
- you can create a template and save it – leaving the only thing you need to do is add your content
- it connects brilliantly to your other social media – for example you can have it automatically publish to your Facebook page
- you can schedule your newsletter (so you can write it on Monday but have it be sent out on a Friday morning)
Mailchimp is pretty intuitive to use but I outline here some steps for getting started.
Step 1: Contact list and administrators
Before you create your account, make sure you have a list of email contacts that you would like to send your regular letter to – if these are in an excel spreadsheet this is one of the easiest ways to upload them to Mailchimp, or you can just copy and paste them in. I collected ours from booking forms for baptisms and weddings and also our electoral roll. Now, whenever people book something with us I tell them about our newsletter and that I will add their name (making sure they know they can unsubscribe at any time).
Decide how regular to make your newsletter (ours is weekly – using much of the detail that usually goes on the weekly pew sheet at church) – or you might like to do one monthly or even quarterly.
Decide who will work on your newsletter and ensure they have access to the account as well (you can add users).
Step 2: Create your account and add your contact list
Go to Mailchimp.com and create an account. Add your contacts in a list. Tip: don’t bother with what they call ‘groups’ – I tried and it’s too fiddly, create a separate list for each group if you wish (eg. wedding contacts, baptism contacts, general…) or just one master list if you’re doing a generic email newsletter.
Fill in the sections accordingly (here’s an example):
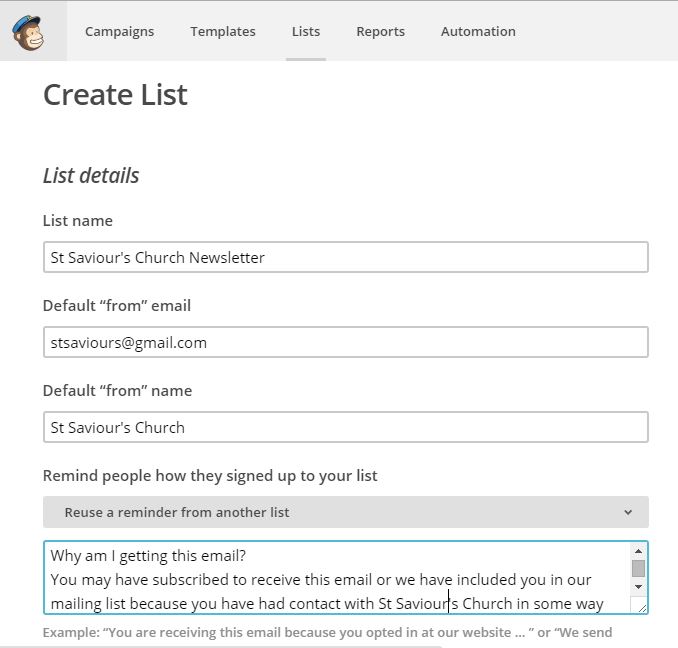
In this bottom box feel free to use the following text:
Why am I getting this email?
You may have subscribed to receive this email or we have included you in our mailing list because you have had contact with X Church in some way over the last year, you may have been married here, had your baby baptised, joined us for worship or are a regular member of the congregation. Whatever your connection we feel it’s important to keep in touch with you and let you know what’s happening at X and from time to time reflect on life, God and the world around us. If you would rather not receive this email, please use the unsubscribe link below.
This is what appears at the bottom of the email people will receive.
Add your church/organisation’s address and then choose how and when you want to receive notifications from Mailchimp if someone subscribes or unsubscribes. Then click ‘save’.
Then click ‘import subscribers’ and I suggest clicking on the ‘copy/paste’ option. Then simply open your email list and copy and paste the addresses into the box:
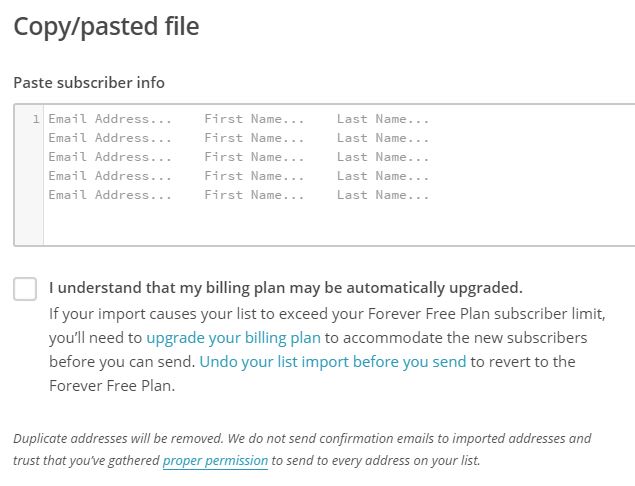
You don’t have to have the first name and last name for it to work, you can just paste the email addresses on their own into the first column. Tick the box underneath (nothing is likely to happen unless you’re pasting thousands of addresses in!) Then click ‘next’. Choose the ‘subscribed’ option on the next screen and click ‘import’. It may take a little while depending on the number of addresses you’ve added and they will send you an email when it is done. Remember that you can add new addresses to the list at any time.
Step 3: Create newsletter template
This bit takes a bit of time but once you’ve done it you can reuse it again and again for all your newsletters. Go to Mailchimp home (click on the monkey head in the top left of the screen), then click on Templates and Create template:

If you are a beginner I suggest choosing one of the basic options provided. The one we use is 1:2 column.

This is the area in which you can design your template, the system is quite easy to use and works on a ‘drag and drop’ basis. If you go to delete something it double checks you really want to do it so it is fairly idiot proof! Here’s a short video I made on using this section of Mailchimp:
Step 4: Sending your newsletter
Rather confusingly this is called a ‘campaign’ in Mailchimp, a campaign is simply an email that goes out to a list. So you’re ready to send your first newsletter now.
Click on Campaigns and ‘create campaign’. Select ‘regular campaign’, choose the list to send it to and click ‘next’. Then give your campaign a name, fill in the fields:

You may wish to let it autopost to your Facebook page – click to connect your Facebook page on the button:

Then click ‘next’ at the bottom of the screen – you can always go back on any of these steps if you forget something.
Click on ‘Saved Templates’ next and find the template you made earlier:

Then add all the content you want to your newsletter by clicking on the boxes and changing the text and images:

If you want to see what it will look like click on ‘Preview and Test’ at the top of the page and ‘enter preview mode’.
Under ‘Preview and Test’ you can also send a test of the email – this is worth doing the first time just so you can be sure it looks how you want it to look.
Once you’re happy, click next at the bottom right of the screen and go through the final steps before clicking either on ‘send’ if you want it to go immediately or ‘schedule’ if you want to specify the time it will be sent:

Finally, click on ‘schedule campaign’ and you’re all done!
And that’s it, there are some other really good features in Mailchimp that you will discover the more you use it but it is a really good way of keeping in touch with people, you might not see them all in church on a Sunday but people are really glad to be reminded that you care and that you’re there for them.

You have given a very helpful account of how to set up MC that I read a few hours after talking locally about the same process with our vicar. May we ask more questions?
thank you
LikeLike